HOME     ABOUT    CONTACT

Wednesday, March 27, 2013

One Pot Thai Chicken Pasta

Until now, coconut or anything coconut-flavored had never entered my kitchen... unless my old roommate did so without telling me! :) Anyway - I tend to avoid coconut like the plague, but when KK and I were on our honeymoon in Thailand, we had the opportunity to make the most amazing curries! "When in Rome," right? Or Thailand! Based on a recommendation from KK's cousin and his girlfriend, we went to a half-day cooking course at Siam Rice Thai Cookery School in Chiang Mai.  It was most certainly one of the honeymoon highlights.  The course took us to the local food market where we learned about the common ingredients used in Thai cooking - lemon grass, holy basil, Thai basil, turmeric, Thai eggplant, and satoh beans.  After the market, we met with the head chef and owner of Siam Rice, Nancy; she was cheerful, knowledgeable, and put us to work right away! KK and I each cooked several dishes: a soup, noodle dish, stir fry vegetables, curry paste and, of course, a curry.  After using a mortar and pestle to grind our curry pastes by hand, KK and I ended up with a Panang curry, and a red curry with pumpkin.  Since our Thai curry-making was such a success back in November, KK decided we might as well give coconut cooking a try at home!

This recipe required a good deal of hands-on time, so I recommend having everything prepped in advance - chopped, minced, and measured! We didn't have coconut milk, so KK did a little research and decided that we should use half coconut water and half evaporated milk (or heavy cream).  The substitution probably decreased the intensity of the coconut flavor, so it worked perfectly for us!

One Pot Thai Chicken Pasta
Adapted from Heat the Oven to 350
Time: 40 minutes
Serves: 4

Ingredients
1 lb boneless, skinless chicken breasts, cubed into 1 inch pieces
3 tablespoons vegetable oil
1 onion, chopped
1/2 teaspoon red pepper flakes
1/4 teaspoon ground coriander
1 1/2 tablespoons minced fresh ginger
3 cloves garlic, minced
8 ounces pasta, bowties or spirals
2 1/2 cups chicken broth
1/2 cup coconut milk
2 red bell peppers, seeded and cut into thin strips
1/2 pound sugar snap peas
1 can water chestnuts
2 tablespoons lime juice
Salt and pepper

Directions
1. Season chicken with salt and pepper. In a large skillet, heat 1 tablespoon oil over medium heat. Cook chicken until it is lightly browned but not fully cooked, about five minutes.  Set chicken aside.

2. Add 1 tablespoon of oil the same skillet (less dishes to wash), and add chopped onion, red pepper flakes, coriander and a dash of salt. Cook until onions soften, about 3-4 minutes; stir frequently to avoid burning.  Add ginger and garlic and cook until fragrant, about 15 seconds.

3. Sprinkle pasta evenly into the skillet, and pour the broth and coconut milk over it. At medium heat, cover skillet and bring to a boil, about 5 minutes.

4. Reduce the heat to medium-low and stir in the red peppers and water chestnuts. Recover and continue to simmer, stirring every few minutes, until the pasta begins to soften, about 10 minutes.

5. Stir in the sugar snap peas and chicken and any accumulated juice from the chicken. Cover and continue to simmer until the chicken is cooked through, about 7 minutes longer.

6. Remove from heat and stir in the lime juice. Season with salt and pepper to taste and serve.

Monday, March 25, 2013

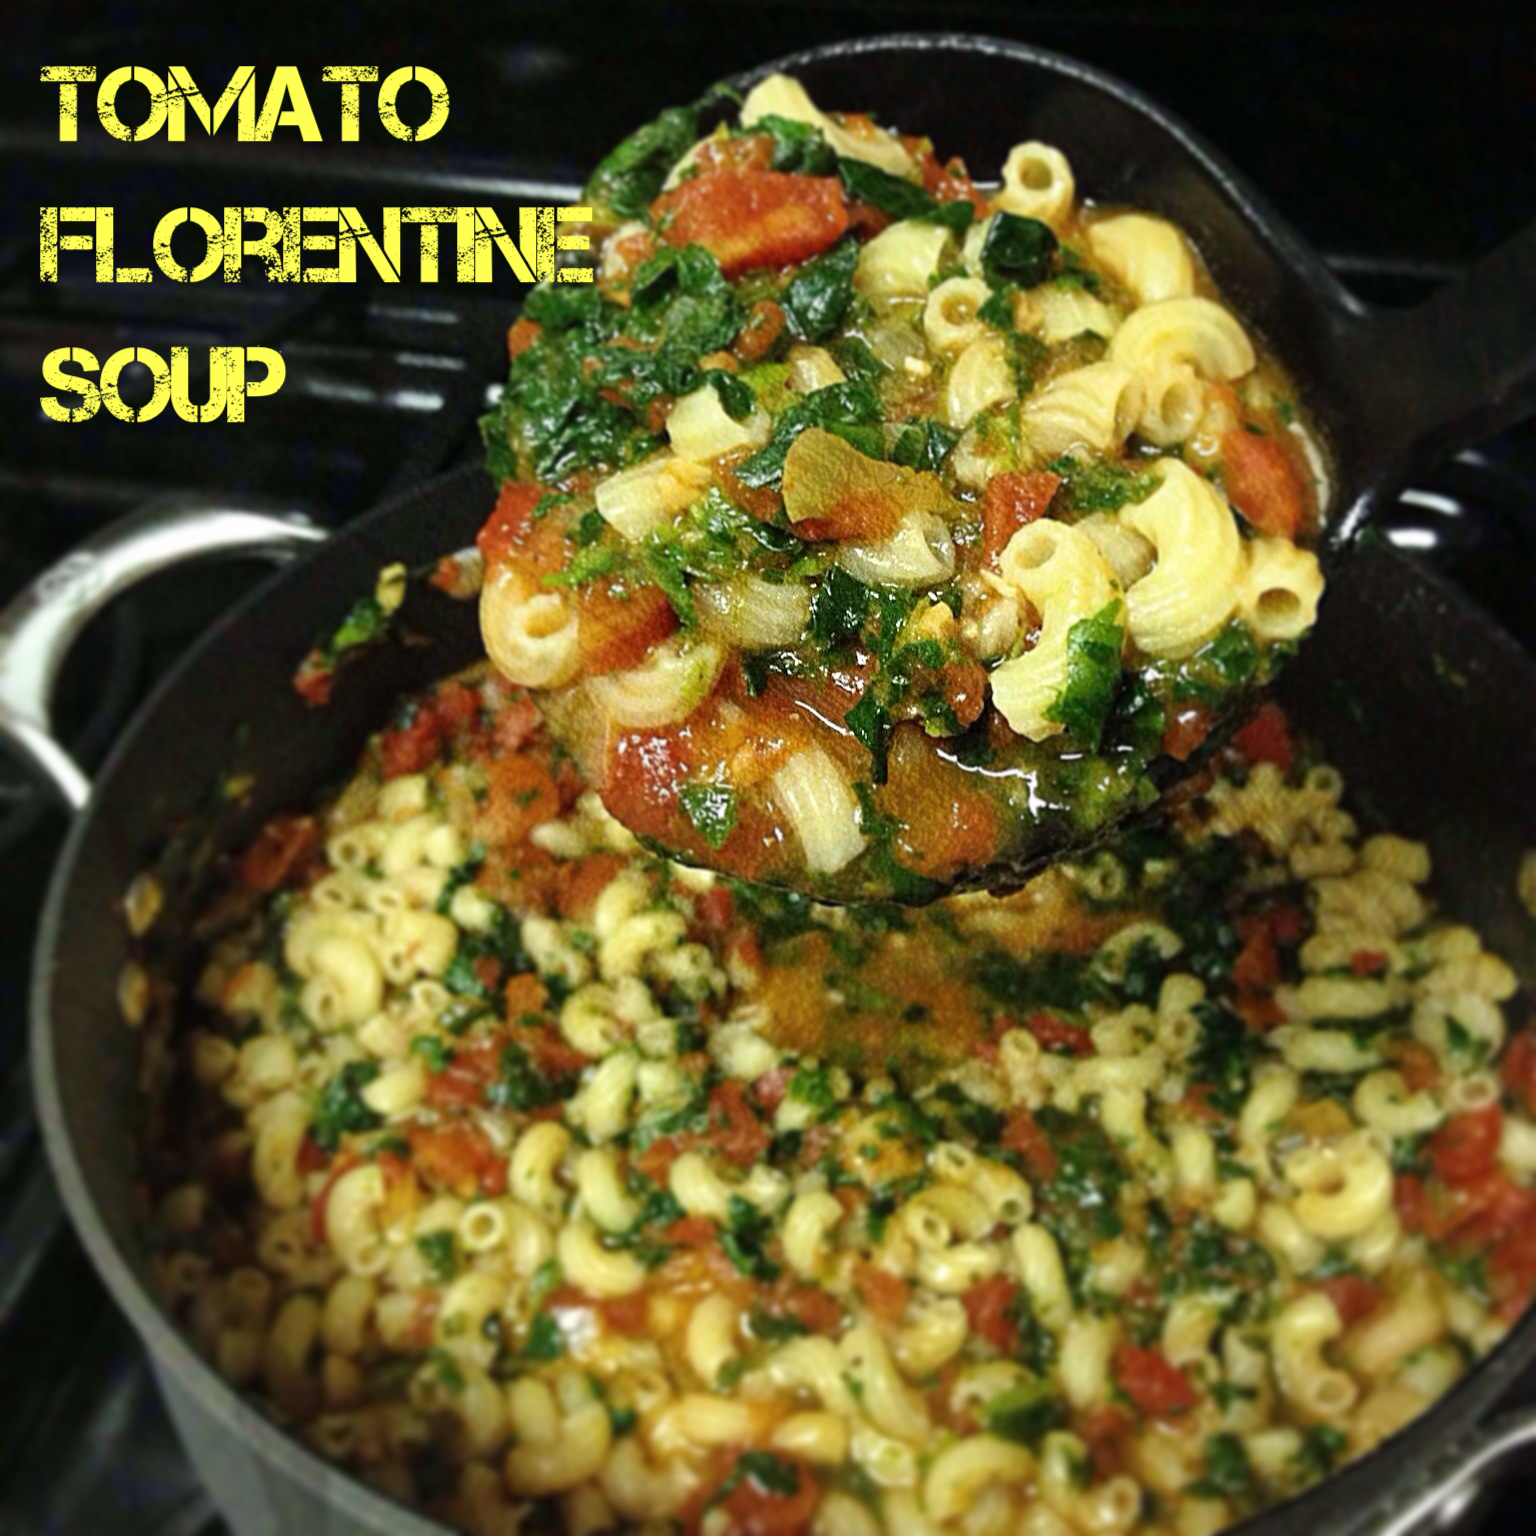
Easy Tomato Florentine Soup


I finally made use of my last unopened bridal shower gift – the Dutch oven! According to Wikipedia, Dutch ovens are well suited for long, slow cooking, such as in making roasts, stews, and casseroles.  I went the more commercial route for my first Dutch oven, opting for a Calphalon non-stick aluminum one instead of cast iron.  I figured it would be easier to use, but I already have my eyes on a spare Le Creuset enameled cast iron Dutch oven that’s lying around my Dad’s house… and it’s red! It just may find its way into my car next time I’m visiting him! Although the Dutch oven was high on my registry list, I left it in the box (and stored in the guest bedroom closet) for several months before using it.  What was I thinking!?!? The 5-quart dish made cooking soup much easier than the other 3-4 quart saucepans that I’d been using.  Now I have a project for this week – organizing pots and pans to make room for the Dutch oven in the kitchen cabinets.

I echo Good Life Eats enthusiasm for having a stocked kitchen.  KK and I already had all of the soup ingredients in stock, so I’ll keep this recipe in mind for the rare evening when we need a last-minute dinner plan! The original recipe called for 3-5 cups of vegetable/chicken broth, so I made the executive decision to use 4 cups.  Things looked rather liquidy while simmering, but most of the broth was absorbed when I added the pasta.  Dinner ended up being more like a watery pasta instead of soup.  I've updated the directions below, recommending that you use 5 cups of broth to get the perfect soup-to-pasta ratio.

Easy Tomato Florentine Soup
Adapted from Good Life Eats
Serves: 4
Time: 40 minutes

Ingredients

8 oz. small pasta
1 tablespoon olive oil
1 tablespoon butter
1 medium yellow onion, chopped
1 1/2 tablespoons tomato paste
1 tablespoon light brown sugar
3 - 14.5 ounce cans diced tomatoes, drained and juice reserved
1 tablespoon minced garlic, about 3 cloves
2 tablespoons flour
2 bay leaves
5 cups vegetable or chicken broth
10 ounces frozen spinach, thawed and drained
salt & pepper, to taste
1 teaspoon balsamic vinegar
Parmesan cheese, for serving

Directions
1. Cook pasta according to package directions.

2. Meanwhile, heat the butter and olive oil in a large Dutch oven over medium-high heat. Add the onions and saute for 3 minutes. Add the brown sugar, tomato paste, and diced tomatoes (reserve juices for a later use). Cook until the tomatoes begin to dry, about 13 minutes.

3. Add the garlic to the dutch oven, stir, and cook for about 1 minute. Stir in the flour and continue to cook for another minute.


4. Stir in the reserved tomato juice and bay leaves. Pour broth slowly into the Dutch oven.  Bring the soup to a boil, then reduce to a simmer and cook for 10-15 minutes.


5. Remove bay leaves; stir in pasta, spinach and balsamic vinegar. Season with salt and pepper, serve with baguette and grated Parmesan.

Sunday, March 24, 2013

Chipotle Chicken Tortilla Soup

The winter weather just won't let up! I was hoping for nice weather weekend, but Saturday was both cold and windy.  We picked up a dresser from Craigslist on in Jersey City, and the drawers nearly blew other while we were loading the car! Since it's not feeling like spring yet, KK decided to sneak in this hearty soup into the rotation.  Monday's forecast is also calling for snow, so maybe we'll add a few more soups to the menu plan before spring finally arrives!

I only defrosted 0.8lbs of chicken so KK and I were a bit nervous the soup wouldn't be filling enough.  To accompany the soup, I cooked up a side of Chicken Fajita Rice a Roni.  The rice and soup seasonings were a prefect pair.  Once I finished cooking the chicken, I placed it in a mixing bowl and used my hand-mixer to shred it.  Going the hand-mixer route was much easier than shredding the chicken with a fork! I almost skipped the tortilla chips, but KK insisted and I'm glad he did - they were a nice, crispy topping for each bowl!

Chipotle Chicken Tortilla Soup
Adapted from Eat Yourself Skinny
Serves: 2-4
Time: 30 minutes

Ingredients
1 Tbsp vegetable oil
1 1/2 tsp. minced garlic
2 chicken breasts, cooked and shredded
1 tsp. chipotle chile powder
1 tsp. ground cumin
1 cup water
1/4 tsp. salt
1 (14 oz) can fat-free, low-sodium chicken broth
1 (14.5 oz) can stewed tomatoes
1/4 cup fresh cilantro
1 lime, cut into 4 wedges
2 (6-inch) tortillas, cut into strips
Cooking spray 

Directions
1. Heat oil in a large saucepan over medium-high heat.  Add minced garlic and shredded chicken; saute for about 2 minutes.  Add chipotle chile powder and cumin; stir well.  Add water, salt, chicken broth and tomatoes and bring to a boil.  Cover, reduce heat and simmer for about 5 minutes.

2. Meanwhile, preheat your oven to 350 degrees.  Place tortilla strips on a baking sheet.  Spray strips with cooking spray and sprinkle with a touch of chipotle chile powder.  Bake at 350 for about 8 to 10 minutes.  Top soup with baked tortilla strips.

Saturday, March 23, 2013

Pesto Veggie Manicotti

I make homemade bread once and all of a sudden - I'm a regular baker! KK and my Dad requested the homemade baguettes again and, since they weren't actually difficult to make, I obliged.  Also, I (not so) secretly wanted fresh bread myself because I knew it would be the perfect compliment to Friday night's Italian dinner. On a quick, unrelated note, my Dad had me try Cafe Solano by Peet's Coffee this morning.  It was a bit stronger than the Hazelnut Dunkin Donuts I'm used to, but it was still pretty good!

Back to dinner - which KK started asking about around 10AM today.  I prepped the manicotti while the bread baked, and things got a bit messy.  I tried to pipe the cheese mixture into the pasta using a Ziploc bag, but I struggled with that because the spinach kept getting caught on the bag.  I emptied the Ziploc back into the mixing bowl and filled the manicotti by hand.  The pasta tore a few times, but neither KK nor my Dad noticed once the dish was cooked, covered with sauce and cheese.  To complete the meal, we paired it with a 2007 Rulo Columbia Valley Syrah.  According to this review, this Syrah is "extremely dense, with deep and intense raspberry and cassis fruit flavor augmented with coffee grounds, smoke, and iron filings." Maybe that's why I had Peet's coffee on the brain?


Pesto Veggie Manicotti
Adapted from My Happy Meals
Serves: 4
Time: 45 minutes

Ingredients
1 box of manicotti noodles
1/2 tsp olive oil
3 cloves of garlic, minced
1/2 medium onion, diced
1/4 cup of grated carrots
15 oz ricotta cheese
1 cup grated Parmesan cheese
3 tbsp of pesto
1 bag fresh baby spinach, torn into small pieces
1/2 tsp garlic powder
to taste: black pepper, salt, parsley, oregano, thyme
mozzarella cheese for topping
24 oz jar sauce

Directions
1. Cook manicotti according to package instructions.

2. Meanwhile, preheat oven to 350.

3.  Saute onions, garlic, and carrots in a pan with 1/2 tsp of olive oil.

4. In a large bowl, combine ricotta, Parmesan, pesto, spinach, cooked veggies, and spices.

5. Cover the bottom of a 9x13 glass baking dish with a thin layer of sauce. 

6. Stuff the noodles gently with the cheese mixture and arrange in the pan.

7. Cover stuffed manicotti with the remaining sauce, and top with shredded mozzarella and parm cheese.  Bake for 20-25 minutes.

Friday, March 22, 2013

Sweet and Sour Chicken

I last cooked this dish a few years ago in KK's NYC apartment.  His studio kitchen was so small (although not really that bad when compared against the NYC standard), and I had such a difficult time flipping the chicken on the less-than-9x13-sized pan.  Things were much easier this time around with a proper baking dish!

I also remembered the chicken being a bit dry, so I decided to double the sauce this time (ingredients below are already doubled).  During the last 12-minute cooking period, I sauteed some water chestnuts, sliced carrots, and green peppers to add a little color and nutritional value to the meal.  During dinner, my Dad suggested adding something to give the meal some added crunch, so I'll try adding cashews next time.  I served the chicken and vegetables with brown rice, and the sauce-to-chicken-to-rice ratio was perfection.  Topping it off with Sriracha sauce, I kept dinner sweet by pairing the meal with a bottle of 2008 Mandelberg Gewurztraminer.

Sweet and Sour Chicken
Adapted from Brown Eyed Baker
Time: 1 hour 20 minutes
Serves: 4

Chicken Ingredients
1 to 1½ lb. chicken breasts, cut into chunks
salt and pepper, to taste
1 cup cornstarch
2 eggs, slightly beaten
¼ cup canola oil

Sauce Ingredients
1½ cup sugar
8 tablespoons ketchup
1 cup vinegar (rice or white)
2 tablespoons soy sauce
2 teaspoons garlic powder

Directions
1. Preheat oven to 325 degrees.

2. Season chicken with salt and pepper.

3. Working in two batches, toss the chicken pieces in cornstarch and then coat with the egg. Heat the oil over medium-high heat and again in two batches, brown the chicken, turning it so that all sides are browned.

4. Spray a 9x13 baking dish with cooking spray, and place the chicken in a single layer in the dish.

5. Whisk together the sauce ingredients in a bowl and pour evenly over the chicken. Turn the chicken to ensure each piece is coated.

6. Bake for 50 minutes, turning the chicken four times - every 12-13 minutes.

Thursday, March 21, 2013

Homemade French Baguettes

My Dad drove up from Virginia today for a belated birthday visit.  He was supposed to visit the week before my birthday, but the original trip was postponed due to Winter Storm Saturn (when did they start naming snowstorms?).  A belated birthday visit meant belated birthday gifts - one of which was a baguette pan!

With the day off from work, I didn't waste any time testing out the pan.  During the inaugural use of the baguette pan, I also had my first experience baking with yeast.  I have an irrational fear of using yeast, so I've only experimented with quick bread recipes.  I don't really know what I was worried about - cooking with yeast was easy, although a good deal of patience was required while the dough was rising.  The bread came out beautifully! It turned golden brown after 10 minutes so I took it out of the oven early, but I should have left it in a few minutes longer to really crisp up the crust.  The inside of the bread still turned out to be extremely moist.  Between me, my Dad, and KK - we devoured the first loaf in a matter of minutes (as part of lunch, I swear!).  We'll see if the other loaf lasts until dinnertime!

One final warning: I used a Corningware dish as my oven-safe bowl, but thought it was a good idea to preheat with the dish in the oven. WRONG! After the bread finished baking, I removed the Corningware from the oven and noticed a large crack in the dish.  Thanks to Corningware's 1-year warranty that you don't need to register for, I'll be receiving another gift in 7-10 business days: a new casserole dish!


Homemade French Baguettes
Adapted from Cooking Channel TV
Time:1 hr 35 min
Yields: 2  12-14 inch baguettes

Ingredients
1 1/2 tablespoons dry active yeast
2 tablespoons honey
3 1/2 to 4 cups all-purpose flour, plus more for dusting
2 teaspoons salt
Canola oil, for greasing bowl
3 to 4 ice cubes

Directions
1. Combine the honey, yeast and 1/2 cup warm water.  Stir to combine and let the mixture stand about 5 minutes until the yeast activates and begins to foam.

2. Mix the flour and salt in a large mixing bowl (KitchenAid if you have one!) with a dough hook and slowly add in the yeast mixture. Gradually add 1 cup warm water and mix until the dough comes together into a ball that is not too wet.  You might not need all of the water. If the dough is sticky, add a little bit more flour.

3. Turn out the dough onto a floured surface and knead until the dough is smooth and elastic, 2 to 6 minutes. To test if the dough is kneaded thoroughly - press in the dough with your thumb and it will bounce back when it's ready. 

4. Form the dough into a ball, place it in a lightly-oiled bowl.  Cover with a dishcloth, and let rest in a warm environment until doubled in size, 25 to 30 minutes. 

5. Punch down the dough and divide it in half. Shape into 2 baguettes by making a flat rectangle out of your dough, then folding the top and bottom towards the middle, like an envelope, and sealing the seam with your fingers. Keep repeating the folding and sealing, stretching the rectangle lengthwise as you go, until it's about 12 to 14 inches long and 2 inches wide. Fold and seal either end to round. Flip seam-side down and place on a sheet pan or baguette pan that has been dusted with flour. Score the tops of the loaves, making deep diagonal slits 1/2-inch deep.  Again, cover dough with a dishcloth and let rise in a warm environment until they have doubled in size, 25 minutes. 

6. Position your oven racks with one on the bottom and the other in the middle, then preheat to 450 degrees.

7. Once the oven is preheated and the dough is nearly ready, place an oven-safe (non-glass) bowl or pan on the bottom rack. 

8. When your bread has doubled for the second time, quickly remove the towel.  Simultaneously slide the sheet tray with the baguettes onto the middle rack while carefully throwing the ice cubes into the bowl on the bottom rack. The ice will create a burst of steam that will give you a nice crispy crust. Quickly shut the oven door so no steam escapes. Bake the baguettes until golden brown, 10-15 minutes depending on your oven.

Sunday, March 17, 2013

Southwest French Bread Pizza

What a busy weekend! I did almost no cooking, but it was a very food-centric weekend.  For my birthday on Thursday, KK and I went to Teak for Customer Appreciation Night... nearly everything is half price! Teak's sushi is delicious, but it's even better when it's 50% off.  On Friday, I organized a birthday happy hour at McSwiggans; their Friday special: $5 All-You-Can-Eat Nachos! I had such a great time seeing all my friends in one place! My friend Liz and her husband were in town from Philly on Saturday, and we went for a BYOB (or sake) dinner at Illuzion and drinks at Hoboken Bar & Grill.  Today we went to KK's cousin's baby shower.  It was such a cute, Winnie the Pooh themed party and the catered Indian food was delicious, especially the spicy Paneer 65. 

This recipe would be perfect for a quick and easy weeknight meal.  The original recipe called for pico de gallo, but we used store-bought salsa instead.  Although the final product was delicious, it didn't seem quite crisp enough.  Next time, I'll try toasting the bread before adding the toppings. Fingers crossed the leftovers reheat well!

Southwest French Bread Pizza
Adapted from Tasty Kitchen
Time: 20 minutes
Serves 4

Ingredients
1 can 14.5-oz. black beans
1 Tablespoon chili powder
1 can 4 oz. diced green chilies
2 cloves garlic
1 ½ cup salsa
1 loaf French bread
¾ cups shredded Monterey Jack cheese
1 avocado, sliced

Directions
1. Drain black beans, but do not rinse. Pour beans into a skillet over medium heat for 2 minutes.  Add chili powder and stir. After 2 minutes, add diced green chilies. Continue to cook on medium heat for 2-3 more minutes while stirring. If it seems too dry, add in a tablespoon or two of water.

2. Dice garlic and add it to the black bean/green chili mixture. Keep on medium heat for another 2-3 minutes while stirring.

3. Remove mixture from the heat; stir in salsa.

4. Cut French bread in half lengthwise, then cut the halves into pieces about 6 inches long. Carve out a small area in the middle of each piece of bread. Spoon the black bean mixture onto the bread and cover it completely with the mixture.

5. Top pizzas with the shredded cheese.

6. Put pizzas into broiler for about 2-3 minutes. Cook until the cheese is slightly brown, but try not to burn the bread.

7. Top with the sliced avocado and enjoy!
Related Posts Plugin for WordPress, Blogger...